About Me

My photo
I am working mom who loves to cook and bake. I hope to keep track of recipes and share some of my better ones. In the process, hopefully my photography and cooking will get better and better!

Wednesday, August 31, 2011

Toffee Brownie Torte


This may be the richest dessert ever.  It also is a bear to decorate.  Do you see my mush marks trying to get the toffee to stick?  It's not pretty in my hands, but I have to say....it is awesome.  The brownies alone??   Really.

We brought this to the first dinner with new friends- a good way to see whether they can take your messy but delicious ways.  Definitely an ice breaker.

I also have in mind a variation of putting cream cheese frosting in between and on top for something different.  But brownies as cake layers?  This Rebecca Rather is serious.  Serious.

Toffee Bar Brownie Torte
Adapted from Annie's Eats who adapted from The Pastry Queen

makes enough to feed an army.

Ingredients:
For the brownies:
2 cups (4 sticks) unsalted butter
16 oz. bittersweet chocolate, coarsely chopped
3 cups sugar
8 large eggs
2 tbsp. vanilla extract
2½ cups all-purpose flour
½ tsp. salt

For the frosting:
3 cups chilled heavy whipping cream
1/3 cup confectioners’ sugar
1 tsp. vanilla extract
2 tbsp. instant espresso powder dissolved in 2 tsp. boiling water, chilled

For the filling:
16 oz. mascarpone cheese
2 tbsp. instant espresso powder dissolved in 2 tsp. boiling water
½ cup confectioners’ sugar
2 tsp. vanilla extract
Pinch of salt
1 cup reserved frosting (above)

For garnish:
2 cups  finely chopped toffee bars

Directions:
To make the brownie layers, preheat the oven to 350˚ F.  Grease and flour the edges of three 9-inch round cake pans and line the bottoms with parchment paper.  Combine the butter and chocolate in a large heatproof bowl set over a few inches of simmering water (double boiler).  Continue heating until the butter and chocolate are melted and smooth, stirring occasionally with a spatula.  Remove the bowl from the heat and move on.

Transfer the chocolate mixture to a large mixing bowl. Whisk in the sugar, eggs and vanilla extract until the mixture is smooth and glossy, about 1 minute.  Stir in the flour and salt, and mix just until the dry ingredients are incorporated.

Divide the batter evenly between the prepared baking pans.  Gently smooth the batter in the pans, or rap them on the counter to settle.  Bake 20-25 minutes, until the brownies are just firm to the touch.  Transfer to a wire rack and let cool in the pans 30 minutes.  Then run a knife around the edge of each pan and invert the brownies onto the rack to cool completely.

To make the frosting, add the chilled heavy cream to the bowl of an electric mixer fitted with the whisk attachment.  Whip on medium-high speed until medium-soft peaks form.  Blend in the sugar, vanilla and espresso mixture, whipping just until combine.  Continue to whip until stiff peaks form.  Reserve and refrigerate 1 cup of the frosting for use in the filling.  Set aside the remaining frosting.

To make the filling, in the bowl of an electric mixer fitted with the paddle attachment, combine the mascarpone, espresso liquid, sugar, vanilla and salt.  Beat on medium speed until well blended and fluffy, about 2 minutes.  Gently fold in the reserved 1 cup of frosting with a spatula.

To assemble the torte, lay 1 of the brownie rounds to a large serving platter.  Spread half of the filling mixture evenly over the top.  Layer with another brownie round, and the remainder of the filling.  Top with the last brownie layer.  Cover the top and sides of the cake with the frosting.  Garnish with the toffee bits to cover the top and sides of the cake.  Get em on any way you can.  Use any remaining frosting to pipe decorative swirls around the top edge of the cake if you can summon the strength.  Refrigerate until ready to serve.


Monday, August 29, 2011

Watermelon Lemonade


Unfortunately, I like this much more than the kids do.  It's a nice thing to have on hand when you want to drink something that feels celebratory but your husband suggests maybe you should NOT make a pitcher of margaritas for a change.  I'm confident once the weather stops being so hot the margarita thing will pass.

Otherwise, I've always wanted to see rancho mirage.  Luckily, when I get back this little pick me up will still be accessible!!  


Watermelon Lemonade
Adapted from Smitten Kitchen

makes 2 large glasses

1/4 cup (2 ounces) fresh-squeezed lemon juice
1/2 cup (4 ounces) fresh watermelon puree, strained through a coarse strainer to remove seeds
3 tablespoons (1 1/2 ounces) simple syrup (i.e. 1 part sugar to one part water, heated to dissolve)
3/4 cup (6 ounces) cold water

Stir it all together and serve over ice.

Saturday, August 27, 2011

The back forty-a.k.a. bourbon lemonade

Adult guests.  We get overly excited.  And by we, I mean, me.  I made a quadruple batch of margaritas and this.  For 5 adults.  At lunch time.  OK, so maybe we need to get out more.

I initially made this as suggested in the NY times, but quickly realized there was a reason that Deb made it less strong.  This drink definitely still has a kick, but it is refreshing and appealing to the non bourbon liker.  Definitely a way to help me get rid of the bourbon in our house!  Unfortunately I'm still on a quest to home make big Y's sweet bourbon steak sticks, so I think there will be a lot more bourbon to get rid of in house until I get it right...

Back Forty
Adapted from the New York Times

10 tablespoons maple syrup
12 ounces bourbon
12 ounce lemon juice
30 dashes orange bitters
Lime wedge for garnish.
In a cocktail shaker, mix syrup with 4 tablespoons hot water. Add bourbon, lemon juice and bitters. Add ice and shake. Strain drink over ice in glass. Garnish.
Yield: 6 drinks.

Thursday, August 25, 2011

Carrot Ginger Salad Dresing


Do you love the carrot dressing in japanese restaurants?  ME TOO!!!!  Do you need something tasty to help you  eat leafy green vegetables?  ME TOO!  Do you have a $14 jar of miso?  ME TOO!!!!  Well, I did, until I figured out that my husband when kitchen purging, cleaned us out of it. I have to say that it seems that stuff keeps forever, and thank heavens 'cause it costs a fortune.  Anyway, this dressing is so good, I rebought that ridiculously priced jar of miso and I would do it again.  You might want to double this recipe.

Carrot Ginger Dressing
Adapted from Smitten Kitchen


Serves 4, with dressing to spare

1 large carrot, peeled and roughly chopped
1 small shallot, peeled and roughly chopped
2 tablespoons roughly chopped fresh ginger
2 tablespoons sweet white miso
2 tablespoons rice vinegar
2 tablespoons toasted sesame seed oil
1/4 cup grapeseed or canola oil
2 tablespoons water

1 small/medium head of lettuce or mixed greens of your choice


Whiz the carrots, shallot and ginger in a blender or food processor until finely chopped. Scrape down the sides, then add the miso, vinegar and sesame oil. While the machine running, slowly drizzle in the canola oil and the water.

Drizzle salad with plenty of dressing and serve.

Tuesday, August 23, 2011

Carmelized Onion and Chipotle Beef Tacos


Wow.  I am so impressed by this meal.  These tacos were simple and absolutely delicious.  Probably this has something to do with my adoration for goat cheese, but I could eat these every night for a week before moving on to something new.  Don't be fooled by the few ingredients, it's loaded with flavor.  We plan to try it with chicken, and with grilling the beef to make it a little better for us.  But it will definitely appear again.

note: I buy canned chipotles in adobe and then store them in the fridge in tupperware.  I usually use them within 8 weeks, and it hasn't killed me yet.

Carmelized onion and Beef Tacos
Adapted from Elly says Opa who adapted from Rick Bayless


4-5 chipotles in adobo
1 lb. skirt or flank steak
3 Tbsp. canola, divided
2 medium onions, sliced 1/4″ thick
12 warm corn tortillas
sea salt
goat cheese

Puree the chipotles in a small food processor until smooth.  Marinate for an 2 hours to overnight in the fridge.
I placed the whole thing in a zip top and smeared the chipotles on through the safety of plastic.

Heat an oven or warming drawer on low heat (200F).  Wrap the tortilla in aluminum foil and stick them in the oven.

Heat 2 Tbsp. of the oil in a large, heavy-bottomed or cast iron skillet over medium-high heat.  Add the onions and cook  until carmelized.  Carmelizing them takes me 20-30 minutes, but apparently Elly and Rick can do this in 5 minutes.  Transfer to a heat-proof bowl and set in the heated oven.

Return the skillet to medium-high heat, and add the remaining Tbsp. of oil.  Once hot, lay in the steak, and cook until it’s done to your liking (3 minutes per side for medium-rare skirt steak, 5 minutes per side for medium-rare flank steak).  Let the meat rest for 5-10 minutes before slicing against the grain.

Toss the meat with the onions, and season to taste with 1 teaspoon salt.

Serve with the warmed tortillas, goat cheese, and salsa.


Sunday, August 21, 2011

Tomato Sauce With butter and onion- new favorite


So like the touch of grace biscuits, this is another delicious, potentially signature recipe that I have had for a decade.  And never made before tonight.  

It's from Marcella Hazan's Essentials of Italian Cooking, which we got for a wedding present.  And it seems like a total one to pass over.  It has 3 ingredients.  You have them in your possession.  And there's nothing fancy.  No basil.  No salt. No pepper.  No parmesan.  No oregano.  

You won't miss them.  The sauce is tangy but sweet.
Tomato Sauce with onion and butter
Hardly adapted from Marcella's Essentials of Italian Cooking

Ingredients
1 28 ounce can of whole peeled tomatoes, in juice.
5 tablespoons butter
1 onion, peeled and halved.

Melt butter.  Add tomatoes.  Add onion.  Let simmer for about 45 minutes.  Either crush tomatoes against the pan or blend with an immersion blender.  Serve.  Marvel at how this happened.   

Friday, August 19, 2011

Parmesan Breadsticks


I'm relatively sure with these, you could live on bread alone.  The way they rise makes them very light.  They taste like Pizza Hut, in the best possible way one could mean that.  Food snobs run away if you must but you're missing on on some seriously good sticks.  Serve these with my roasted red pepper sauce.

Breadsticks
adapted from King Arthur Flour 
1 1/2 cups lukewarm water
3 tablespoons olive oil, plus additional for drizzling
1 1/4 teaspoons salt
3 1/2 cups (14 3/4 ounces) King Arthur Unbleached All-Purpose Flour
1 tablespoon instant yeast

Directions
1) Lightly grease an 18" x 13" pan (half sheet pan), and drizzle 1 to 2 tablespoons olive oil in the bottom.

2) Combine all of the ingredients, and beat at high speed with an electric mixer for 60 seconds.

3) Scoop the sticky batter into the prepared pan, spreading it nearly to the edges. Oiling your fingers helps with the job.

4) Use a rolling pizza wheel or knife to score the dough in 3/4" to 1" wide crosswise strips, to make 13"-long strips. Score the dough once lengthwise, so that you now have 6 1/2"-long strips. Cover the pan, and let the dough rise at room temperature for 60 minutes, till it's become puffy.  I actually let it rise about 2 hours, and I hate to say, I'd do it again.  The texture was great.

5) While the dough is rising, preheat the oven to 375°F.

6) Drizzle the dough lightly with olive oil, and sprinkle with breadstick seasoning.

7) Bake the bread till it's a very light golden brown, about 25 minutes.

8) Remove it from the oven, and carefully lift it out of the pan onto a rack.

9) As soon as you can handle it, cut the dough along the score lines. A pair of scissors is perfect.

10) serve warm, or at room temperature.


Breadstick Seasoning:
Adapted from Pennies on a Platter

2 tablespoons to 1/4 cup grated Parmesan
1/2 tablespoon garlic powder
1/2 tablespoon garlic salt (of 3/4 teaspoon garlic powder plus 3/4 teaspoon salt)
1 tablespoon onion powder
1 tablespoon dry oregano
1/2 tablespoon dry basil

Breadsticks


Wednesday, August 17, 2011

Crispy Chicken Taquitos


I don't know that I really can convey how much I love this recipe.  I love it with corn tortillas, because they get all crispy and taste like tortilla chips.  I love it with flour tortillas, because they don't break like the corn ones (although it is the breaking that makes them crispy).  

I love it with spinach.  I love it with chicken thighs instead of chicken breast.  I'd probably love it with beef instead of chicken.  It's great made the day before and stuck in your fridge until you cook it when you get home late from work.  It's great kept in the freezer on hand as need be.  


Creamy Chicken Taquitos

Ingredients:
3 oz. cream cheese, softened
¼ cup salsa
1 tbsp. freshly squeezed lime juice
1 tsp. chili powder
½ tsp. cumin
½ tsp. onion powder
2 cloves garlic, minced
3 tbsp. chopped cilantro
10 oz spinach, frozen, thawed and squeezed dry
1-2 green onions, chopped
2 cups shredded cooked chicken
1 cup shredded Mexican cheese
10-12 6-inch flour or corn tortillas
Cooking spray
Kosher salt


Preheat the oven to 425˚ F.  Line a baking sheet with parchment paper.

In a large mixing bowl, combine the cream cheese, salsa, lime juice, spices, cilantro, spinach, green onions, chicken and shredded cheese.  Mix until well combined.

Place a tortilla on a work surface.  Spoon 2-3 tablespoons of the filling mixture down the middle of the tortilla.  Roll the tortilla up tightly around the filling.  Place seam-side down on a baking sheet.  Repeat with the remaining tortillas and filling, spacing the assembled taquitos evenly on the baking sheet.  Spray the tops lightly with cooking spray and sprinkle with a pinch of kosher salt.

Bake 15-20 minutes, until crisp and golden brown.   Serve with sour cream and salsa, or guacomole.

Monday, August 15, 2011

Coconut Chicken with Apricot Sauce


My husband loved the sauce, which I knew would be the case.  Especially since I hid the fact that it was the dreaded fruit and meat combination.  It tastes vaguely asian in origin, and certainly more complex than mixing preserves with mustard.  It's a great sauce to have up your sleeve.  I really liked the chicken, and it didn't taste sweet.  I also think this could be easily adapted as an appetizer with coating chicken strips or nuggets and dipping them in the sauce.  Overall, a hit.

Coconut Chicken with Apricot Sauce
Adapted from Pennies on a platter


1 egg
1 cup sweetened coconut flakes
1/2 cup flour
1/2 teaspoon garlic powder
1/2 teaspoon salt
1/4 teaspoon black pepper
4 boneless chicken breasts
Butter Spray

Sauce:
1/4 cup apricot preserves
2 tablespoons Dijon mustard

Preheat the oven to 400˚F.  Line a baking sheet with parchment paper.

Lightly beat the egg in a medium bowl.  Mix the coconut, flour, garlic powder, salt and pepper in a different bowl suitable for dredging.  Working with one chicken breast at a time, dip the chicken in the bowl with the beaten egg and then coat with the coconut mixture.  Place on the baking sheet.  Once all chicken breasts are coated and on the baking sheet, spray with butter spray.  Bake for 30 to 40 minutes, flipping once.

To prepare the apricot sauce, mix the apricot preserves and the Dijon mustard in a small bowl.  Chill in the refrigerator until ready to serve, or keep at room temperature.  Drizzle over chicken.


Saturday, August 13, 2011

Chocolate Oatmeal Cookies


My husband waxes poetic about these cookies.  For years I wondered about what these mysterious "chocolate oatmeal" cookies were, made by his grandmother, and I lamented the loss of this secret family heirloom recipe.  At some point he mentioned they were no bake.  At this point I realized I had made these exact cookies in home ec class circa 1987.  Well, that was a happy, if somewhat anticlimactic moment.

I want the Baked boys to take these on and "style 'em up some, merchandise 'em up with some shoes" (movie- anyone?  anyone? SJP in SATC the movie).  I have to say my attempt to do this with espresso powder was worthless, so I omitted it from this recipe.  There are tasty and quick, just the thing to make the kids think you are magic.

Chocolate Oatmeal Cookies
Adapted from Food Network


Ingredients
2 cups sugar
4 tablespoons cocoa
1 stick butter
1/2 cup milk
1 cup peanut butter
1 tablespoon vanilla
3 cups oatmeal

Directions
In a heavy saucepan bring to a boil, the sugar, cocoa, butter,  and milk. Let boil for 1 minute then add peanut butter, vanilla and oatmeal. On a sheet of waxed paper or parchment, drop mixture by the teaspoonfuls, until cooled and hardened.

Thursday, August 11, 2011

Vanilla Ruffle Cake


Ruffle Cake.  It's easy.  It's impressive looking.  And very forgiving.  I topped this cake with swiss meringue buttercream, which is rich, but not very sugary.  It's a good frosting for the mostly sugar averse (and pro-butter).  My niece tried to make this frosting and had trouble, so we had to try it together.  Turns out I think it was a lack of whipping problem- you really so have to beat the egg-sugar mixture until it look like meringue- this also cools it down.  

I like this cake base a lot, but I would extra vanilla bean next time- change made below!  If you don't have cake flour, use all purpose, but it will be more dense.


Vanilla Buttermilk Cake 
Adapted from Sweetapolita

Yield: One 8″ triple layer cake; serves 12-16

Ingredients:

4 whole eggs
2 egg yolks
2 teaspoons vanilla extract
1 tablespoon vanilla bean paste
1 1/4 cups buttermilk
3 cups cake flour
2 cups sugar
4 1/2 teaspoons baking powder
1/2 teaspoon salt
2 sticks (8 ounces) unsalted butter, at room temperature

Method:

1. Preheat the oven to 350° F. Butter the bottoms and sides of three 8-inch round cake pans or spray to coat with vegetable oil. Line the bottom of each pan with a round of parchment or waxed paper and grease the paper.

2. Put the eggs and yolks in a medium mixing mixing bowl, add the vanilla extract and paste, and 1/4 cup of the buttermilk. Whisk to blend well.

3. Combine the flour, sugar, baking powder, and salt, in a large mixer bowl; whisk to blend. Add the butter and the remaining 1 cup buttermilk to these dry ingredients.  Mix gently with a whisk. Beat until light and fluffy, about 2 minutes.

4. Add the egg mixture in 3 additions, scraping down the side of the bowl and mixing only until thoroughly incorporated. Divide the batter among the 3 prepared pans.

5. Bake the cake layers for 28-32 minutes, or until a cake tester or wooden toothpick inserted into the center comes clean and the cake begins to pull away from the sides of the pan. Let the layers cool in the pans for 5 minutes; then carefully turn out onto wire racks, peel of the paper liners, and wrap in saran wrap, then in tin foil, and put in the freezer to chill for an hour.  This seals in the moisture.

6. To assemble the cake, place one layer, flat side up, on a cake stand or serving plate. Spread 3/4 cup of Frosting over the layer right to the edge.  Ruffle the sides with a pastry bag and petal tip.  Video from someone else here.


Swiss Meringue Buttercream
Adapted from Sweetapolita (and here) and Whisk Kid

Vanilla Bean Swiss Meringue Buttercream        

Ingredients:

5 large egg whites
1 cup, plus 2 tablespoons granulated sugar
1 pound (4 sticks) unsalted butter, softened, cut into cubes
1 1/2 teaspoons pure vanilla extract
 1 tablespoon vanilla bean paste or 1 vanilla bean, split and scraped
 pinch of salt

Wipe the bowl of an electric mixer with vinegar on paper towel, to remove grease. Add egg whites and sugar,  and simmer over a pot of water (should not be boiling, or touch the bottom of the mixing bowl), whisking constantly, until the sugar has completely dissolved and the egg whites are hot.  The best thing is to stick a finger in there and check for grittiness.  

With whisk attachment of mixer, begin to whip until the mixture is thick, glossy, and cool.  Feel free to put some frozen veggie packages on the side of the bowl to speed things up. Switch over to paddle attachment and, while mixing on medium speed continously, add softened butter in chunks until incorporated, and mix until it has reached a silky smooth texture (if curdles, keep mixing and it will come back to smooth).  If it doesn't, stick it in the fridge for 1/2 an hour and try again.  Add vanilla and salt, mix well.

Keep in airtight container in refrigerator for up to one week.


Tuesday, August 9, 2011

Buffalo Chicken Salad


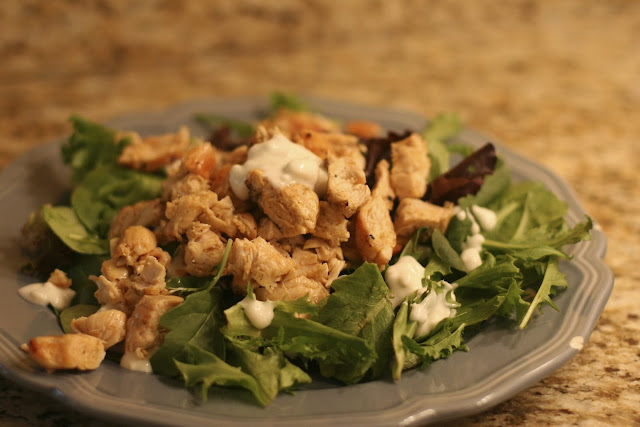
It's hot.  Cooking indoors is not an appealing option.  But somehow, spicy food is perfect in the heat.  This salad lets you eat buffalo wings without the horrible fried drug sticks, messy fingers, and blaring TV in the sports bar.  : )

It's fairly healthy, and you could make it more so by skipping the butter in the spicy marinade altogether, although there is quite a kick if unmitigated by the blue cheese.  We ate this as an entree salad.  I always find eating spicy things makes you satisfied with less food.


Buffalo Chicken Salad
adapted from Ellie Krieger

Chicken:
2 tablespoons hot sauce (I'm partial to Frank's or Tabasco)
1 Tablespoon of butter, melted
3 tablespoons olive  oil
1 -1 1/2 lbs chicken breast cut into 1 1/2 inch strips, or chicken breast tenders

Lettuce- romaine, or spring mix

Marinate chicken in 3 tablespoons olive oil for at least 3 hours, or several days.  Preheat the grill.  Grill chicken  for about 4-5 minutes per side, until cooked through.  In a large bowl, combine the hot sauce and the butter, add chicken and toss until the chicken is well coated.

Blue Cheese Dressing:
2 tablespoons mayonnaise
1/4 cup lowfat buttermilk
1/4 cup plain fat-free yogurt, greek style (regular will be too thin)
1 tablespoon white vinegar
1/2 teaspoon sugar
1/3 cup crumbled blue cheese
1/2 teaspoon Salt
1/4 teaspoon freshly ground pepper

 In a medium bowl, whisk the buttermilk and thickened yogurt into the mayonnaise until smooth. Add the vinegar and sugar and whisk until all the ingredients are well combined. Stir in the blue cheese and season with salt and pepper to your preference.

Serve with lettuce (optionally adding grated carrots, celery, and scallions if desired) either tossed or topped with blue cheese dressing and chicken.


Sunday, August 7, 2011

Spicy Red Pepper Sauce


I had almost forgotten about this sauce.  When we lived in New Orleans, this sauce was one of the things that kept us coming back to a great little pizza joint not far from home.   I know New Orleans has finer cuisine than this---- believe me, we've had our share--- but when we went back to New Orleans (for the first time in 10 years), this was on the list.  Besides the fact that we ate there a lot in our early days of courting, they have fantastic salads, awesome pizza, and this killer focaccia bread sauce.   It's got quite a bit of heat and a great roasted red pepper flavor.  I had to recreate it once we came back home!

I'm happy to say, this sauce was pronounced "spot on" by both of us, and it got eaten disproportionately from the tomato sauce I had next to it at a lunch time party.  I can't wait to make it again!


Spicy Red Pepper Sauce
inspired by Reginelli's, but made up by me

15 oz roasted red peppers
2 tablespoons olive oil
1/2 teaspoon crushed red pepper
1/2 teaspoon dried oregano
1/2 teaspoon fresh ground black pepper (50 grinds)
2 cloves garlic, minced or pressed
1 teaspoon salt
1/4 cup tomato sauce (I used tomato sauce with onion and butter)

Saute garlic in olive oil until lightly golden.  Add crushed red pepper and saute about 2 minutes until pepper infuses oil.  Add drained roasted red peppers, salt, oregano, pepper, tomato sauce.  Simmer 15-20 minutes, or until flavors marry.  Blend at some point with immersion blender or prior to adding until sauce is fairly smooth.

Serve with pasta, or bread sticks, or on pizza.  If with pizza consider goat cheese, sun dried tomatoes, and carmelized onions- Sun Pie style.....

Friday, August 5, 2011

Soft and Chewy Sugar cookies


These cookies are a happy medium. Not too much hassle when compared to decorating with royal icing, but enough to show someone you think they are special enough to make a fuss over.  They are quite possibly the most sugar laden creations I have ever eaten.  The frosting is pretty much like eating the stuffing of an oreo cookie.

By that description, I mean to say, it's good.  Way better than any buttercream, so don't give me that I don't eating shortening crap.   It no longer has trans fat, so just enjoy it.  Besides, once you taste this filling, you'll realize your beloved oreos are all shortening in their "Stuff!"  

The cookies will spread too  much if you sub butter.  Next time I might add just a little lemon zest, but they are delicious as they are.  I know this, because my son (3years old) kept saying "Those look dee-LISH-us" all morning!  Until he finally got to eat some up...


Soft Sugar Cookies
Adapted from University of Cookie


2/3 cup shortening
2/3 cup room temp unsalted butter
1 1/2 cups sugar
2 eggs
2 teaspoons vanilla (or vanilla bean paste)= consider also the zest of 1/2 a lemon
2 teaspoons baking powder
1 1/4 teaspoon salt
3 1/3 cups AP flour (16.6 oz)

Preheat to 350°F.
Cream butter, shortening and sugar together until light and fluffy.
On medium speed combine the eggs and vanilla until mixed well, and lemon zest, if adding.
Over low speed add baking powder, salt and flour and mix until it comes together.
Roll into "walnut sized" balls or standard cookie scoop size, placing about 2 inches apart on parchment lined baking sheet.
The dough will be sticky.
Bake 8 - 10 minutes until cookie is set but not brown.  I am a fan of underbaking.
When cookies are done let them cool on baking sheet for 2-3 minutes and remove to a wire cooling rack.

While cookies are cooling make your frosting-

1/2 cup shortening
4 1/2 cups powdered sugar
1/4 cups + 2 Tbsp milk
1 t. vanilla

Cream your shortening and powdered sugar together until smooth, slowly add your milk and vanilla.
Mix until smooth.
Color your frosting if you wish and spread on top of your cookies.  Wait until they or cool or the tops may tear.  Add sprinkles or disco dust.

Wednesday, August 3, 2011

Garlic Knots


Do you have any foods that are inextricably linked to a time or place?  I think we all do.  Garlic knots, for me, are this little place in Williamsburg.   This was when I was commuting from Virginia to Boston, and my hubby would pick me up from the airport and we'd go here.  We'd eat margarita pizza and salad, and the house bread was garlic knots.  I have to say this recipe definitely brings that memory back, and is a faithful reproduction of the original.

They also were a surprise hit with the kids!  Who knew- hot dogs, cookies, and garlic knots????  I like that you can refrigerate this recipe and bake off later, which makes it more friendly, but I think it's probably best a weekend treat!


Garlic knots
Adapted from White on Rice Couple


Garlic Knot Recipe
Makes about 40 knots

Dough
0.875 cups (207ml) Warm Water
1/8 cup Olive Oil
1/2 teaspoon Sea Salt
1 1/2 teaspoons Sugar
2 1/4 teaspoons Active Dry Yeast
approx. 2 1/4 c (13 1/4 ounces) all-pupose, unbleached Flour (feel free to make one of these ounces vital wheat gluten)

Garlic Coating
1 tablespoon Olive Oil
1 T  unsalted Butter
2 cloves Garlic, finely crushed
1/8 cups finely chopped fresh Italian Parsley

Sea Salt to taste

plus extra Olive Oil and Flour for making the knots

1. Combine water, olive oil, sea salt, sugar, and active dry yeast in a large bowl. Mix to dissolve yeast.

2. Add flour.  Mix to incorporate flour, cover, and set in a warm spot to proof until doubled in volume (1-3 hours).

3. At this point you can stick in the fridge for a few days if you like.  Slice dough into strips ona well oiled work surface.  Put container of flour within easy reach. Line several sheet pans with parchment paper or silpats.

4.  Using a rolling pin, spread the dough into a quasi  even rectangle approx. 5″x16″ and 1/2″ thick. Slice the rectangle into 1/2″x5″ strips.

5. Sprinkle dough strips and board with flour.  Tie into a knot  and place on lined sheet pan. Place knots about an 1 1/2″ apart.

6.  After each sheet pan fills up, cover with a dry towel, and place in a warm, draft-free spot to rise.

Preheat oven to 400° F

7. After knots have doubled in size, take off dry sack towel and place sheet pans in the oven.  Bake for approx. 12-15 min. or until golden.

8. While knots are baking, make garlic coating.  Gently warm olive oil, butter, and garlic in a small saucepan.  Cook it for a few minutes in oil/butter mix until soft & slightly golden to make garlic more mellow if desired.  Add chopped parsley and set aside.

9. After removing knots from oven, while still warm, either brush with garlic coating.  Season with sea salt to taste.

Best served warm.

Monday, August 1, 2011

Whisky Sour


Meet my other addiction- whisky sours.  To say I'm an amateur mixologist would be an understatement.  I loved Midori sours in college, so the idea that I could make my own sour mix was enthralling to me.  Even better, it comes together very easily, especially if you go the bottle juice route.  Try to get a good quality bottled juice (oxymoron???) since it's a big part of the flavor.

Whisky Sour
Adapted from Ina Garten


Ingredients
3/4 cup whiskey (recommended: Jack Daniel's Tennessee Whiskey)
1/2 cup freshly squeezed or bottled lemon juice (4 lemons)
1/2 cup freshly squeezed or bottled lime juice (4 limes)
2/3 cup sugar syrup (see note)
Ice cubes
Maraschino cherries

Directions
Combine the whiskey, lemon juice, lime juice, and syrup. Chill in the fridge and serve up or on the rocks with a maraschino cherry.

Note: To make the sugar syrup, heat 1 cup of warm tap water and 1 cup of sugar in the microwave for about 2 minutes.  Stir until dissolved.  Chill prior to making.